If you’ve ever attempted meal planning on a budget, you know that it can be tricky at first.
Maybe you’ve heard the dreaded, “What’s for dinner, mom?” one too many times, though, and you’ve decided to do something about it once and for all!
If you’re new at this or you’ve tried meal planning before and failed — let me explain what meal planning doesn’t mean (at least to me).
First of all, it does not mean you have to be a gold-star-for-organization, type A personality in order to follow a meal plan.
It also does not mean that it will take you hours of your precious time each week.
And if definitely does not mean that you will have no flexibility in what you cook each day, especially when your day doesn’t go as planned.
This post likely contains affiliate links. Please see our disclosure for more info.
Benefits to a weekly meal plan
The main benefits of weekly meal planning that I’ve found are:
- It allows me to only make one trip to the grocery store each week (or less)
- It saves us money that likely would have been spent on fast food if I hadn’t planned ahead.
- Having a plan = less stress at dinnertime
Convinced that you should give meal planning a try?
I thought so.
So I’m going to lay out exactly how to create a simple, no-frills weekly meal plan.
Below is a step-by-step guide along with helpful tips that have made meal planning as stress-free as possible for me over the last 18 years.
Basic Meal Planning Guide for Beginners
Once you learn the basics of meal planning (on a budget), you’ll be able to replicate these steps each week and you’ll be amazed at how easy it really is.
>> Be sure to check out our printable Money Saving Meal Planner once you’re ready to dive into meal planning!
Step 1: The Menu Master List
Before you start your first weekly “menu”, I suggest grabbing a sheet of notebook paper or a note card and jotting down a list of meals that you already know how to cook.
Brainstorming Dinner Ideas
Just focus on the main dish for now. For instance, tacos, spaghetti, fried chicken, hamburgers, etc. (These are staples in the Midwest, you know!)
By the way, we’re just focusing on Dinner items at this point. We’ll talk lunches and snacks in a bit.
For your dinners, think about the different protein categories like: beef, chicken, fish, pork, beans.
Then think about different meal categories you enjoy such as: Comfort foods; Mexican food; Italian food; Chinese food, Soups & Stews, for example.
Make your Menu Master List
Add your family’s favorite meals from each of these categories to your list.
Here’s an example of some of the items that were on my list when I first started meal planning years ago:
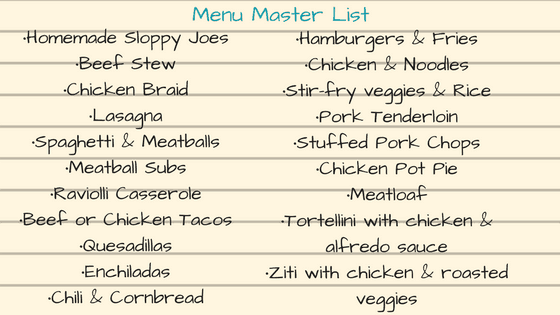
There really wasn’t much more than that when we were first married and I didn’t have a clue! 🙂
Start small, and you will keep adding to this list each week.
You can also go back and add side dish ideas to your main dishes if you choose to.
You will refer back to this Menu Master List every week as you plan the next week’s meals.
Read Next: 20 Quick Dinner Ideas: Homemade + No Recipe Required!
Step 2: Some Fresh Ideas
Search through those dusty recipe books you got as wedding gifts, or find more specific recipes on Pinterest.
Researching New Meal Ideas
I usually shoot for at least one new recipe each week, sometimes two. This will depend on your ambition!
I have four kids and it’s pretty easy for me to get distracted when reading a new recipe (plus it takes a little more time), so I don’t try too many new things each week.

I pick one or two new ideas, and the ones we like get added to the Master Menu List when I start my next meal planning session.
Print and Organize Your Recipes
I’m always more likely to remember to *actually try* a new recipe when I have the paper copy.
Also, when you’re meal planning on a budget it’s easy to get stuck in a recipe rut, so having new dinner ideas on-hand keeps you motivated to cook new things at home, instead.
If you want to get really fancy you can put them in a cute binder like this one .
Mine are currently in a folder that’s stuffed to the brim – so I’m going to spring for the binder this year.
Bonus tip:
If you’re interested in prepping freezer meals in advance, check out this freezer cookbook. The recipes in this book are the best out of all the ones I’ve tried so far!
Read Next: Crockpot Freezer Meals: Our Family Favorites
Step 3: Take Inventory & Browse Sale Ads
The next step is to take stock of what items you already have in your pantry and freezer and plan as many meals as you can with those items, first.
What’s in the Pantry?
Start with meat, your most expensive staple.
If you have frozen chicken breasts, look at your “Master List” plus your printed recipes and decide what meals you could make involving chicken.
For example: chicken tacos, grilled chicken sandwiches, chicken noodle soup. Do the same with ground beef, pork, etc.
Read next: Common items to keep in your pantry and freezer
What’s on Sale?
After this, I normally check the grocery store circulars that list the Sale items for that week.
Browsing store circulars will not only save you money but can be great menu inspiration!
If cheese is on sale at half-price, I’m definitely going to add some type of cheesy casserole to my menu that week.
(In fact, I’ll buy several and freeze the rest for recipes later that month.)
As you decide what meals you’re going to make after looking at your Menu Master List, new recipes and store circulars, write them on a simple piece of lined notebook paper – or see my printable version at the end of this post.
Planning a week of meals: staying organized
Try to plan just seven meals total. Keep it simple if you’re new to meal planning.
You don’t have to decide at this time what you’ll cook for each specific day that week.
But think about your upcoming schedule for the week (and your kids’ schedules) and figure out a few quick meals for those specific days.

If my daughter has a basketball game at 6 pm on Thursday, for instance, I know that’s going to be a “frozen pizza night” at our house with a side of fruit.
I’ll write “Frozen Pizza, fruit-Thursday” on my list, so I won’t forget and cook those pizzas on a different night.
Yes, it’s totally ok to write frozen pizza on your meal plan if you choose to!
The idea is not to cook a 5-course meal each night (unless that’s your preference), but to have a plan that’s realistic for your family.
Sample Menu
Here’s a recent sample menu after going through my pantry and comparing my “Master List” to store circulars, plus a few printed recipes I found:
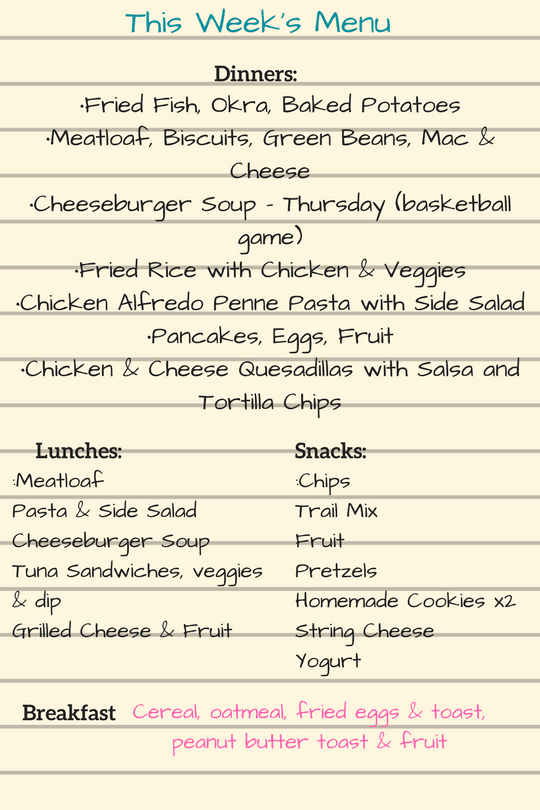
At this point I can look at the meals that will make enough for leftovers and go ahead and plan my lunches.
I also added our snacks and breakfast ideas for the week based on what I already had in my pantry and a few things I planned to buy this week.
(More on this in Step 4.)
Step 4: Make Your Shopping List
Now you’re ready to make a separate shopping list (also included in the printable pack at the bottom of this post).
On this list, of course, you will fill in what items you need for those 7 meals you wrote down.
Look at each menu item and the ingredients you’ll need, and go through your pantry, fridge and freezer one more time, with your list in hand.
Write down any missing ingredients.
Sorting your Shopping List (optional)
You definitely do NOT need to do this, BUT I’ll make a confession: I like to make my shopping list in order of where the items are in the grocery store.
That is super-nerd meal planning level, so don’t feel pressured to do that.
Just know that eventually if you choose to do this, it can be really helpful to avoid zig-zagging back and forth between the same aisles.
I have a search & rescue mentality at the grocery store and I don’t like to waste time there!
Get Kids Involved: Want to give your kids some life skills starting in the kitchen? I recently signed up for this course to get my kids excited about planning meals and preparing food. Take a look!

Adding lunch, breakfast and snack items
If you noticed on my weekly menu above, I also went ahead and added what I plan to serve for lunches that week.
A lot of our lunches are leftovers from dinner.
At the bottom of my dinner menu, I also write down what’s available for breakfast so that everyone can find it and fix it themselves in the mornings.
(Well, at least the ones that are old enough to!)
It can be as simple as cereal or toast. Really! One of my kids’ favorite breakfasts, in fact, is peanut butter toast with mini chocolate chips.
Add some fruit on the side and you’re golden.
Also read: Healthy Breakfast Ideas for Busy Moms
Don’t forget to add in a few snack items (or ingredients to make snacks).
Technically, snacks aren’t part of “meal planning”, I suppose, but you’re going to be shopping only about once a week so you want to plan out the snacks as well.
Here’s a look at my Shopping List after looking at my Menu, my pantry, fridge, and freezer this week:
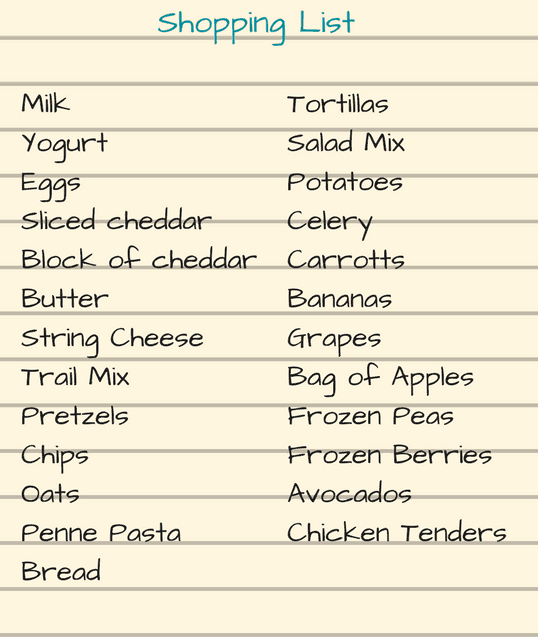
(I had stocked up on a lot of items earlier in the month, so this list was super short. One more benefit to meal planning and stocking up on sale items!)
Now all you have to do is go shopping — that’s the easy part!
Additional Meal Planning Resources
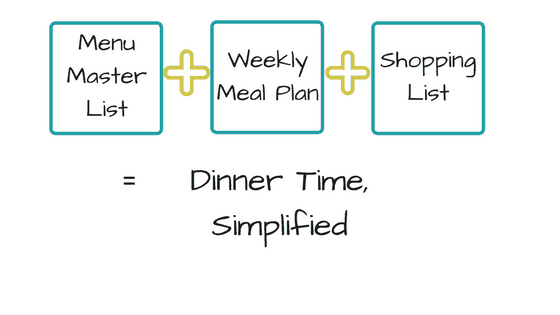
If you need extra help, I’ve created a printable Money-Saving Planning Pack including a Master Menu list, Shopping List, Weekly menu, Pantry and Freezer checklists- and much more.
A few last tips:
If you print and try a new recipe and nobody likes it, throw it away!
Don’t tempt fate that you’ll remember to not cook it again. But be sure to add the “winners” to your Menu Master List so you can keep those in your dinner rotation.
Write in the margin of the recipe any notes for next time: “This was good but dry; add more tomato sauce next time”; or “EVERYBODY liked this except (insert picky child)”.
This helps me the next time I’m planning meals to know how I might need to modify the recipe.
Try to stretch out your seven-day meal plan into eight days (or more) if you can.
Either get creative with leftovers or see if there’s one more meal you can make with your pantry/freezer items without going to the store.
If planning a whole weeks’ worth of meals is an overwhelming thought, you could always do a four or five day menu plan to start out with!
And if you’re in the habit of stopping at the store almost daily for that night’s dinner – only going shopping every four or five days will still be progress!
Whichever method you choose, I think you will find that just a few minutes of preparation each week will pay off tremendously in the middle of your hectic weekday schedule.
You might also like:
EveryPlate Review for Larger Families
What to Stock up on in your Freezer and Pantry
Budget Hacks for Families Big and Small
Cheap Lunch Recipes (that kids will actually eat)
The Best Cheap Instant Pot Meals
Originally posted 9/27/17 and last updated 7/13/23.
I love your tip for throwing away bad recipes. This is so true! Also, this post was so detailed and really pushes me to start meal planning again. I’m pinning this so I can look back at the tips when I get myself back in gear!
I’ve re-cooked bad recipes a-plenty and glad I’m not the only one! 😉 Thanks for the feedback too, I was worried at first it might be too detailed & overwhelm some. Glad to hear it was helpful! Thanks for stopping by!
You refer to your list as basic but I think it is foundational. What wonderful tips.
Thank you Elise! Maybe I should re-think that title! 😉 Thanks so much for the feedback.
These are great tips! I can’t wait to put this into action this week. I love how simple you make this.
Thanks Ashley, I really hope it is helpful! Appreciate the feedback and thanks for stopping by! 🙂
Please send me your weekly meal planner, thanks 😊
Hi there- it looks like the subscription box wasn’t working when you commented earlier. Do you mind to scroll up the page and see if you can subscribe now? The meal planner will be automatically sent after you subscribe (plus you will get the link to access the rest of the freebie library). Thanks so much for your patience!
~Brandi